사용자 설명서 SHIMANO SM-NX10 MONTAGE
Lastmanuals는 사용자 가이드, 오너매뉴얼, 퀵스타트 가이드, 기술 데이터 시트 등의 하드웨어와 소프트웨어의 사용과 관련된 사용자 설명서를 공유, 저장, 그리고 검색하는 서비스를 제공한다. 잊지마세요 : 물건을 사기 전에 반드시 사용자 설명서를 읽으세요
만일 이 문서가 고객님이 찾는 사용설명서, 지도서, 안내서라면, 다운로드 받으세요. Lastmanuals는 고객님께 SHIMANO SM-NX10 사용설명서를 빠르고 손쉽게 찾아드립니다. SHIMANO SM-NX10 사용설명서가 고객님에게 도움이 되기를 바랍니다.
Lastmanuals은 SHIMANO SM-NX10사용자설명서를 다운로드는 것을 도와드립니다.


수동 요약 : 사용설명서 SHIMANO SM-NX10MONTAGE
사용을 위한 자세한 설명은 사용자 가이드에 있습니다.
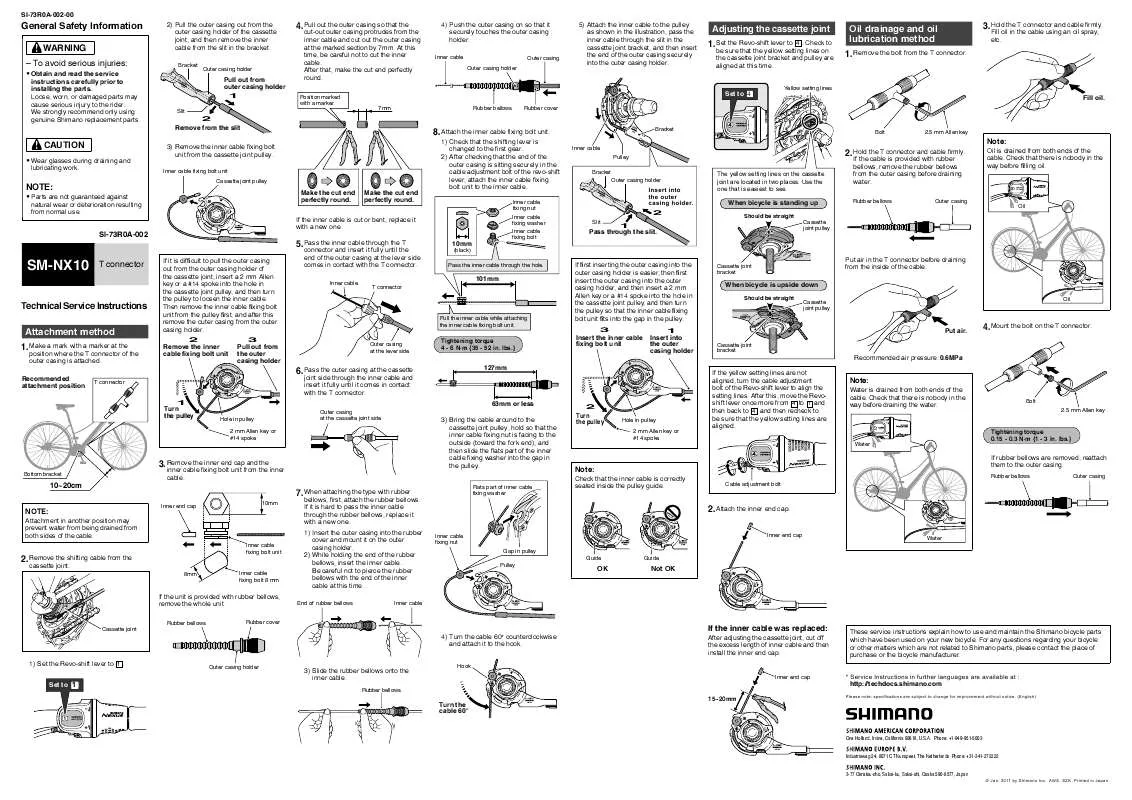
[. . . ] SI-73R0A-002-00
General Safety Information
WARNING
To avoid serious injuries:
Obtain and read the service instructions carefully prior to installing the parts. Loose, worn, or damaged parts may cause serious injury to the rider. [. . . ] Check that there is nobody in the way before filling oil.
When bicycle is standing up
Should be straight Cassette joint pulley
Oil
If the inner cable is cut or bent, replace it with a new one.
SI-73R0A-002
5. Pass the inner cable through the T
SM-NX10
T connector
Technical Service Instructions Attachment method 1. Make a mark with a marker at the
position where the T connector of the outer casing is attached.
T connector
If it is difficult to pull the outer casing out from the outer casing holder of the cassette joint, insert a 2 mm Allen key or a #14 spoke into the hole in the cassette joint pulley, and then turn the pulley to loosen the inner cable. Then remove the inner cable fixing bolt unit from the pulley first, and after this remove the outer casing from the outer casing holder.
2 Remove the inner cable fixing bolt unit 3 Pull out from the outer casing holder
connector and insert it fully until the end of the outer casing at the lever side comes in contact with the T connector.
Inner cable T connector
10mm
(black)
Pass the inner cable through the hole.
101mm
Pull the inner cable while attaching the inner cable fixing bolt unit.
If first inserting the outer casing into the outer casing holder is easier, then first insert the outer casing into the outer casing holder, and then insert a 2 mm Allen key or a #14 spoke into the hole in the cassette joint pulley, and then turn the pulley so that the inner cable fixing bolt unit fits into the gap in the pulley.
3 Insert the inner cable fixing bolt unit 1 Insert into the outer casing holder
Cassette joint bracket
Put air in the T connector before draining from the inside of the cable.
When bicycle is upside down
Should be straight Cassette joint pulley Oil
Put air.
Cassette joint bracket
4. Mount the bolt on the T connector.
Outer casing at the lever side
Tightening torque 4 - 6 N·m {35 - 52 in. lbs. }
Recommended air pressure: 0. 6MPa If the yellow setting lines are not aligned, turn the cable adjustment bolt of the Revo-shift lever to align the setting lines. After this, move the Revoshift lever once more from 4 to 1 and then back to 4 , and then recheck to be sure that the yellow setting lines are aligned.
6. Pass the outer casing at the cassette
Recommended attachment position joint side through the inner cable and insert it fully until it comes in contact with the T connector.
Outer casing at the cassette joint side
127mm
Note:
Water is drained from both ends of the cable. Check that there is nobody in the way before draining the water.
Bolt 2. 5 mm Allen key
1 Turn the pulley
63mm or less
Hole in pulley 2 mm Allen key or #14 spoke
3. Remove the inner end cap and the
Bottom bracket
inner cable fixing bolt unit from the inner cable.
3) Bring the cable around to the cassette joint pulley, hold so that the inner cable fixing nut is facing to the outside (toward the fork end), and then slide the flats part of the inner cable fixing washer into the gap in the pulley.
Flats part of inner cable fixing washer
2 Turn the pulley
Hole in pulley 2 mm Allen key or #14 spoke
Water
Tightening torque 0. 15 - 0. 3 N·m {1 - 3 in. lbs. }
Note:
Check that the inner cable is correctly seated inside the pulley guide.
Cable adjustment bolt
If rubber bellows are removed, reattach them to the outer casing.
Rubber bellows Outer casing
10~20cm NOTE:
Attachment in another position may prevent water from being drained from both sides of the cable.
Inner cable fixing bolt unit Inner end cap 10mm
7. When attaching the type with rubber
bellows, first, attach the rubber bellows. [. . . ] Set to 1
Outer casing holder
3) Slide the rubber bellows onto the inner cable.
Rubber bellows
Hook Inner end cap
Turn the cable 60°
15~20mm
One Holland, Irvine, California 92618, U. S. A. Phone: +1-949-951-5003 Industrieweg 24, 8071 CT Nunspeet, The Netherlands Phone: +31-341-272222 3-77 Oimatsu-cho, Sakai-ku, Sakai-shi, Osaka 590-8577, Japan
© Jan. [. . . ]
SHIMANO SM-NX10 사용자 가이드를 다운로드 받기 위한 면책조항
Lastmanuals는 사용자 가이드, 오너매뉴얼, 퀵스타트 가이드, 기술 데이터 시트 등의 하드웨어와 소프트웨어의 사용과 관련된 사용자 설명서를 공유, 저장, 그리고 검색하는 서비스를 제공한다.
사용자가 원하는 자료가 존재하지 않거나, 불완전하거나, 다른 언어로 되어 있거나, 모델이나 언어가 설명과 맞지 않는 경우 등의 어떠한 경우에도 Lastmanuals는 책임이 없다. 예로, Lastmanuals는 번역 서비스를 제공하지 않는다.
이 계약서의 조항에 동의하시면 계약서 끝에 있는 "사용자 설명서 다운로드받기"를 클릭하세요. SHIMANO SM-NX10 사용자 설명서의 다운로드가 시작될 것입니다.
